Christmas Reindeer · Crochet Kit Video Tutorial
Finished Christmas reindeer

Christmas Reindeer
Crochet Kit · Video Tutorial

14 short videos · follow along step by step · jump to any step you're stuck on

14 steps~65 min of videoBeginner-friendly+20% extra yarn

How to use this tutorial: Start at Step 1. Watch each step's video once before trying it yourself, then check the key points before moving on. Undoing stitches (frogging) is part of the process, not a failure — we've included 20% extra yarn, so undo with confidence.

What's in Your Kit

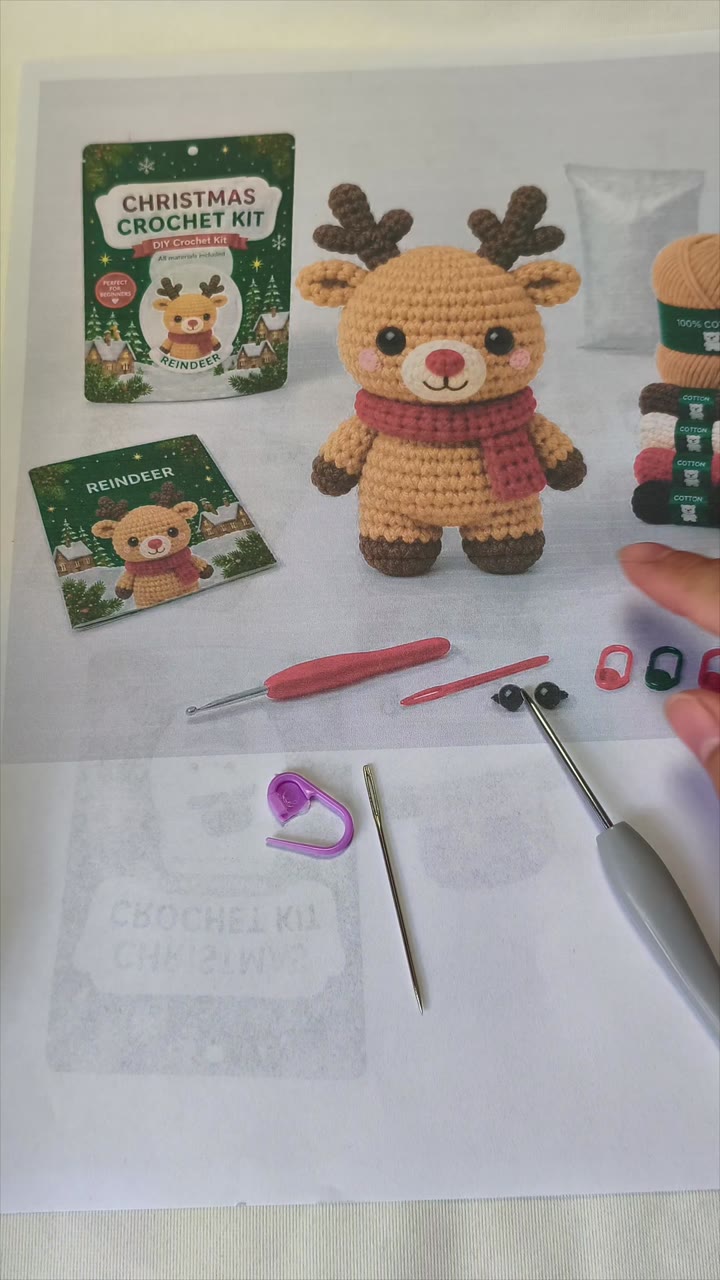
Kit contents laid out
Dark brown yarnhooves, antlers, mouth line
Light brown yarn (main)head, body, arms, legs, ears
Beige yarnmuzzle
Red yarnnose, scarf
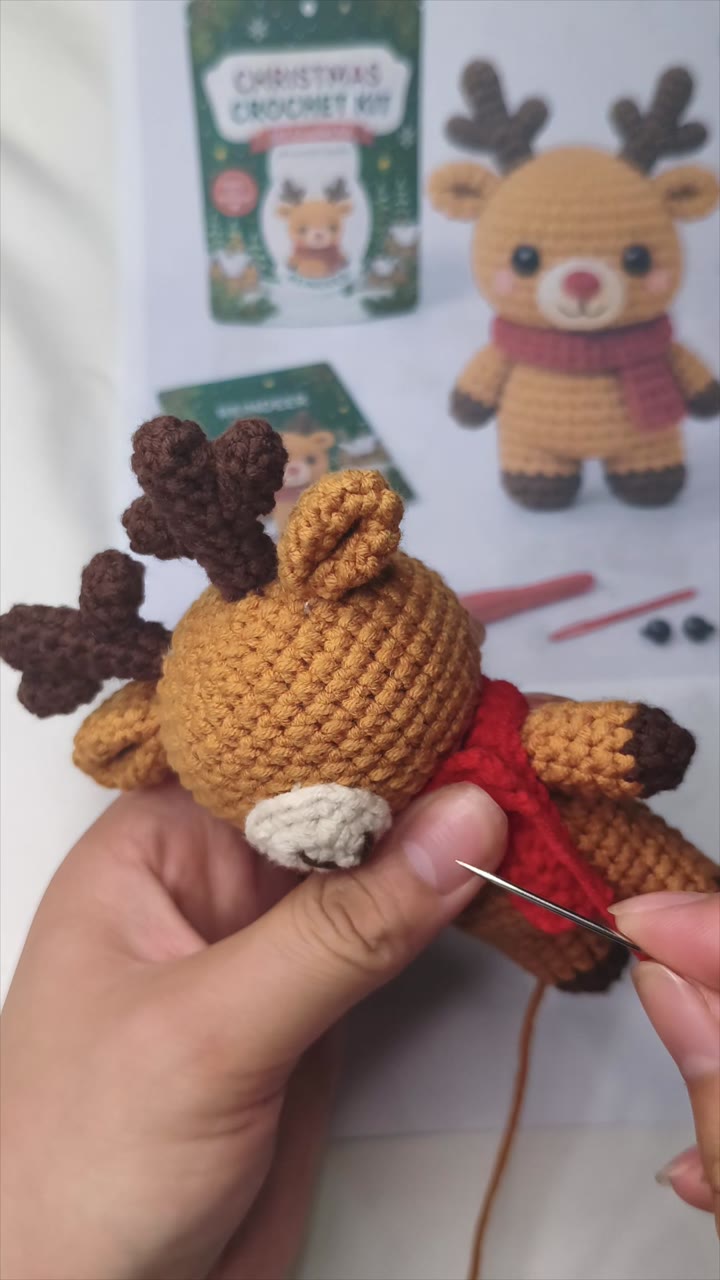
2.0 mm crochet hook · stitch markers · tapestry needle · fiberfill · safety eyes ×2 · glue (for the nose)
Scissors (your own)

Before You Start — Just 3 Things to Know

1

Crochet is simply turning one strand of yarn into a series of knots. One knot = one stitch. Stitches form rounds, and rounds form your reindeer.

2

Every round follows the same rhythm: chain 1 to begin, slip stitch to close. Remember this rhythm and you'll never get lost.

3

Count stitches by counting the little V's on top of your work. Work a round, count a round — if something is off, you only ever undo one round.

Part 1 · Legs & Body

1

Magic Ring + Chain + Single Crochet
The foundation skills · dark brown yarn

Loop the yarn around your finger → insert the hook → pull yarn through, then work 6 single crochet into the ring.

  • After pulling the yarn through, don't tighten it yet — keep it loose and chain 1 first.
  • Single crochet mantra: insert, pull up a loop, pull through both loops.
  • Clip a stitch marker onto your very first single crochet.
Check: 6 single crochet in the ring, with the marker on the first one.
2

Tighten + Find the Stitch + Slip Stitch
Learn to spot the little V

Pull the tail to close the ring → find the first stitch next to the marker → join with a slip stitch.

  • A stitch is the little V on top of each single crochet — always insert your hook under the V.
  • Slip stitch: insert hook, yarn over, pull through everything in one go.
  • From now on, every round ends with a slip stitch and starts with a chain 1.
3

Increases · Leg Round 2
Turning one stitch into two

Work 2 single crochet into every stitch (an increase) — 6 sets in total.

  • From Round 3 you can go without the marker — but keep using it if it helps you see.
  • Every round has a fixed stitch count: work a round, count a round.
Check: After Round 2 you should have 12 stitches (count 12 V's).
4

Invisible Color Change
Dark brown → light brown

Stop after the slip stitch, pull the new color through for that slip stitch — that's the invisible color change.

  • You can cut the old yarn first; chain 1 as usual after changing.
  • Tie the two tails together at the back so nothing comes loose.
  • Then work 3 plain rounds (1 sc in every stitch).
5

Finish Leg 1 + Weave in Ends
Leg 2 works the same way

Fasten off, pull the tail out through the back, and weave it into the fabric.

  • Leg 2 is identical — and needs no color change. Watch Step 6 before making it.
6

Joining the Legs
The trickiest step of the whole kit

Chain 2 on Leg 2, join to Leg 1 with a slip stitch, then crochet around both legs.

  • Skip the slip-stitch spot; find the 2 chains from the very start.
  • Work through one loop only of those chains — don't pick the wrong spot.
Watch out: The 2 joining chains are the easiest place to insert your hook in the wrong spot — match the finger position in video 06 before you commit.
7

Body · Belly Increases + 5 Plain Rounds
Giving the belly its curve

Work a few increases on the front (belly side), keep the back plain, then 5 plain rounds.

  • Front vs back: the side with the chain-1 joins is the back; the other side is the belly.
  • Increases go only on the front — that's what gives the body its curve.
8

Decreases · Closing the Body
Learn to decrease

Decrease = pick up the front loops of two stitches, yarn over and pull through, yarn over and pull through again.

  • Rhythm: 3 sc + dec → 1 plain round → 2 sc + dec → 1 plain round → 1 sc + dec to close.
  • You can fasten off without stuffing — all stuffing can be done at the end.
Handy check: If a decrease round ends exactly on a decrease, your stitch count is right. If not, count back one round to find the slip.

Part 2 · The Head

9

The Head — Full Follow-Along
Light brown · one big round ball

Step 9 · Part 1 of 2
Step 9 · Part 2 of 2

Magic ring 6 sc → (sc, inc) → (2 sc, inc) → (3 sc, inc) → (4 sc, inc) → plain rounds → decreases from Round 14.

  • For "2 sc, inc" and "4 sc, inc" rounds, offset the first set: start with 2 single crochet before the first increase, then work the rest normally — the video shows you how.
  • Add one plain round between increase rounds.
  • Offset the decreases the same way.
  • Finish with a slip stitch and a long tail (you'll need it for sewing in Step 13). Stuff firmly.
Check: A plump, firmly stuffed light-brown ball. Keep that tail long — don't trim it.

Part 3 · Small Pieces

10

Arms ×2
Like mini legs

Magic ring 6 sc → (sc, inc) → change to light brown on the last stitch → 5 plain rounds → one decrease round.

  • After changing color, turn the piece right side out before continuing.
  • Fasten off and stuff lightly — over-stuffed arms look stiff.
11

Antlers + Ears
All mini tubes

Antler main beam: 8 rounds. Two small branches. Ears: magic ring 5, an increase round, then 3 plain rounds.

  • Branches start at 6 and 5 stitches — if 5 is too fiddly, use 6; the difference is tiny.
  • Ears get no stuffing — fold them flat for later.
12

Muzzle + Nose + Mouth Line
New stitch: half double crochet

Beige: magic ring 5 sc + 5 half double crochet. Red nose: magic ring 6, worked tightly.

  • Half double crochet: yarn over → insert → pull up a loop (3 loops on hook) → yarn over, pull through all 3.
  • Round 2 of the muzzle: hdc increases.
  • Work the nose tightly, pull the tail to the back and knot it. The nose is hollow — stitch it down; glue alone won't hold.
  • Mouth line: sew with brown yarn split into 2 strands, placing it as shown in the video.
Check: Hold the muzzle against the head to check the proportions — adjusting now is far easier than after sewing it on.

Part 4 · Assembly

13

Sewing Head to Body
Key point: leave a neck

Position everything first, then sew picking up the side loops of each stitch, alternating front and back — and leave a little neck.

  • Check front and back before sewing; the feet should line up.
  • Sew a few stitches, then snug them gently — don't pull everything tight at once.
  • Leave a generous tail: re-joining a snapped thread mid-seam is a hassle.
Why the neck matters: Sewing the head flush looks tidy, but leaves no gap — and without a gap, the scarf can't be tied on.
14

Final Assembly + Scarf
The moment it comes alive

Step 14 · Part 1 of 2
Step 14 · Part 2 of 2

Antlers onto the head → sew on arms → sew on legs → fold and sew ears → scarf: red yarn, chain 40, single crochet 3 rows.

  • Don't sew antlers too close to the top of the head — leave room for the ears. Secure arms with two passes so they can't come loose.
  • Legs line up under the arms; the two ears sit about one stitch apart.
  • Scarf: chain 40, single crochet into the 2nd chain from the hook, work 3 rows, then sew it around the neck.
Done! Hold up your reindeer — you made this, stitch by stitch.

Troubleshooting

▸ My circle curls up like a bowl

Too few increases, or your tension is too tight. Count your stitches; if the count is right, relax your hands — the hook should turn freely inside each loop.

▸ My edges ripple like lettuce

Too many increases. Check whether you're increasing in every stitch instead of following the spacing.

▸ My decrease round doesn't end on a decrease

It should. If it doesn't, one stitch went wrong somewhere — count back one round to find it.

▸ I lost track of the first stitch / round count

Clip a marker into the first stitch of every round, and count as you go. If it's already tangled, undo just one round — never more.

▸ I sewed a piece on crooked

Pin pieces in place with markers before sewing. Already sewn? Just pull the sewing yarn out and redo it — the fabric won't be damaged.

Show Off Your Reindeer

Post a photo and tag @kickcraft on Instagram or TikTok
to get 20% off your next kit.
Stuck on any step? Message us — a real human replies.

@kickcraft · Christmas Reindeer Crochet Kit
No points off for mistakes. Frogging is allowed. There's plenty of yarn.